Saturday, January 21, 2012

Schoolhouse Block Tutorial


My last post was a brief one, this one much longer. It’s fun seeing all the 3” house blocks so many of you are sharing on your blogs. I thought about joining in, but just wasn’t into piecing that tiny block with many pieces. At the same time I kept coming across schoolhouse blocks in books and magazines and a blog or two - Needle Turnings and Repro Quilt Lover. When I came across a diagram on the Passion Patchwork blog mapping out the piecing order I was ready to give it a try. A couple people seemed interested in how I pieced my schoolhouse block so I thought I’d share it. I couldn’t find a ruler among the many I own with the right angle for the roof so I paper pieced the roof section. Here we go-

This is the diagram I drew for a 9" finished block-


Cutting instructions for sections A and C-

From white fabric-      2-   2 ½” x 2”
1-    2 ½” x 4 ½”
1-    1 ½” x 3 ½”
2-    1 ½” x 5 ½”
3-    1 ½” x 2 ½”

From blue fabric-        5-   1 ½” x 2 ½”
4-    1 ½” x 3 ½”
2-    1 ½” x 5 ½”

For section B (the roof) you will use the remainder 1 ½” strip of white. You will also need a 2 ½” strip from the white fabric and a 3” strip from the blue.


Piece sections A and C using the numbers in the diagram for piecing order-


My source for paper piecing instructions is Show Me How to Paper Piece by Carol Doak. Use a large needle in your machine (90/14) and a smaller stitch length (18-20 stitches per inch or 1.5 on a machine with a range of 0-5).

I drew section B on tracing paper-

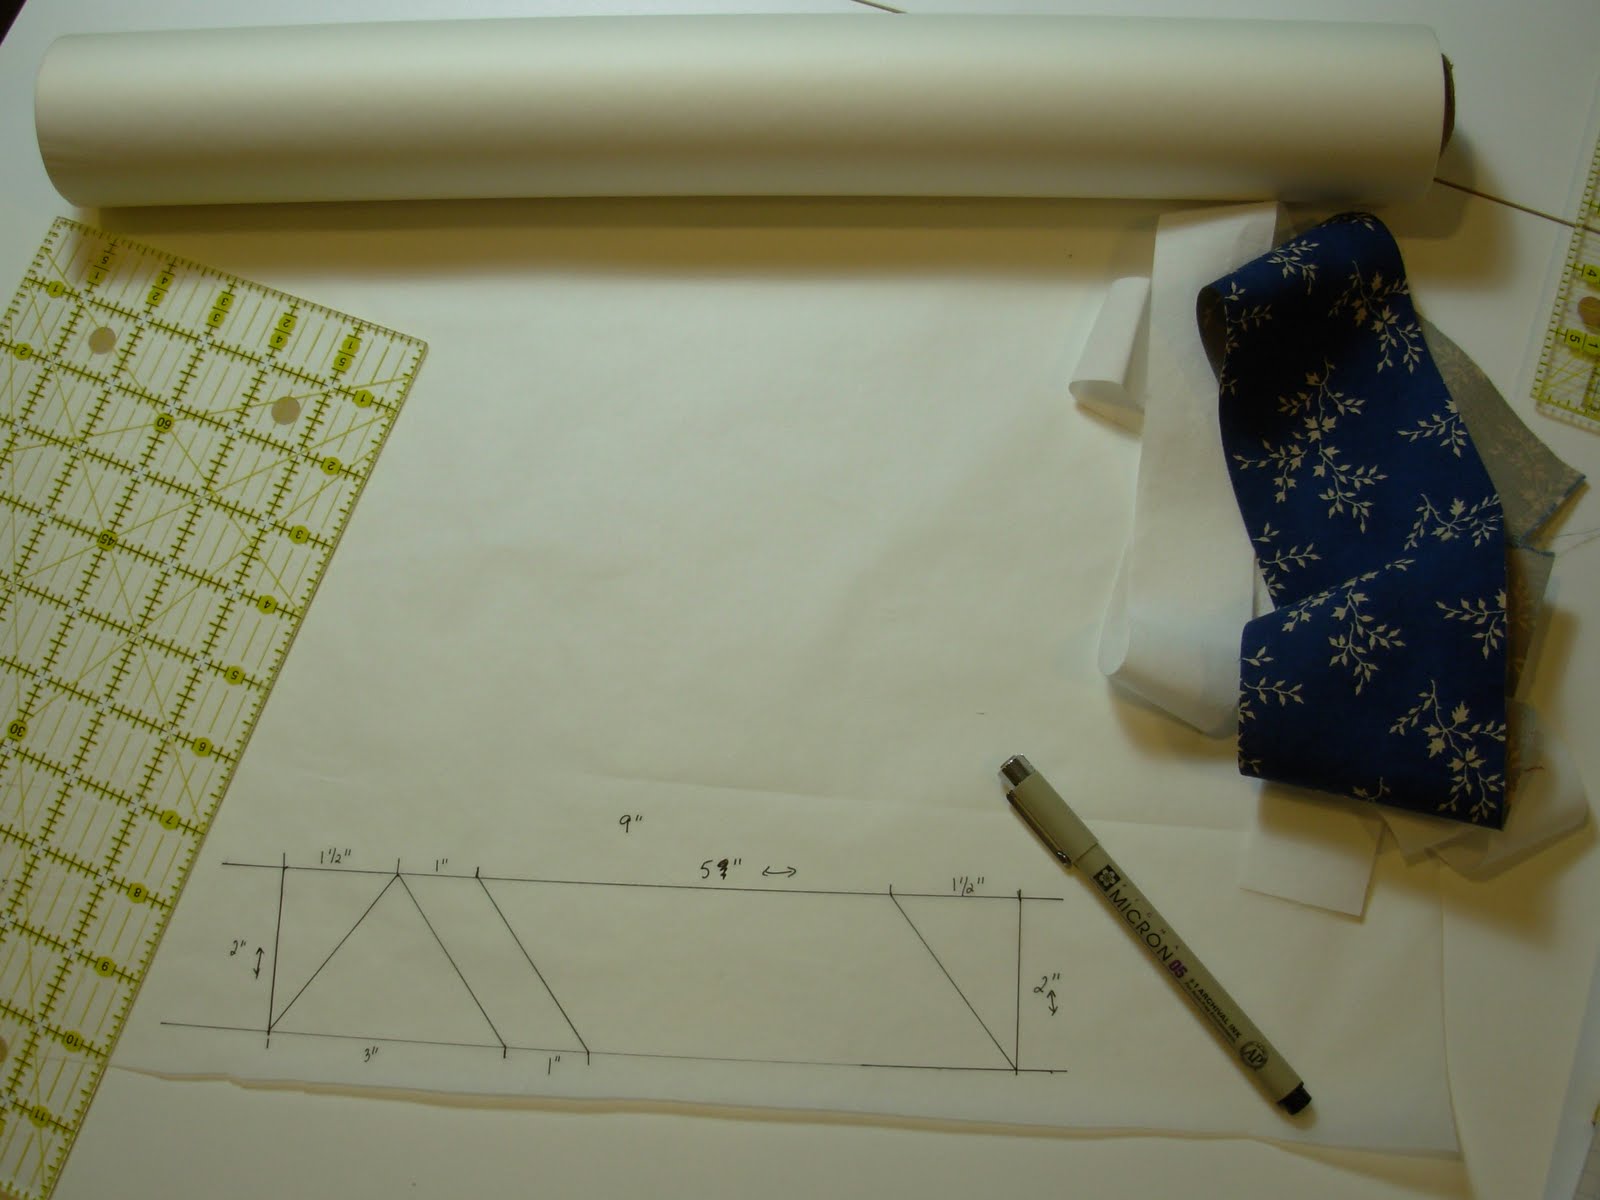
Added 1/4" all around-
Sorry for this poor photo and confusing drawing. If you like, email me and I will send you a pdf of this section.

Click on the the photos to enlarge.

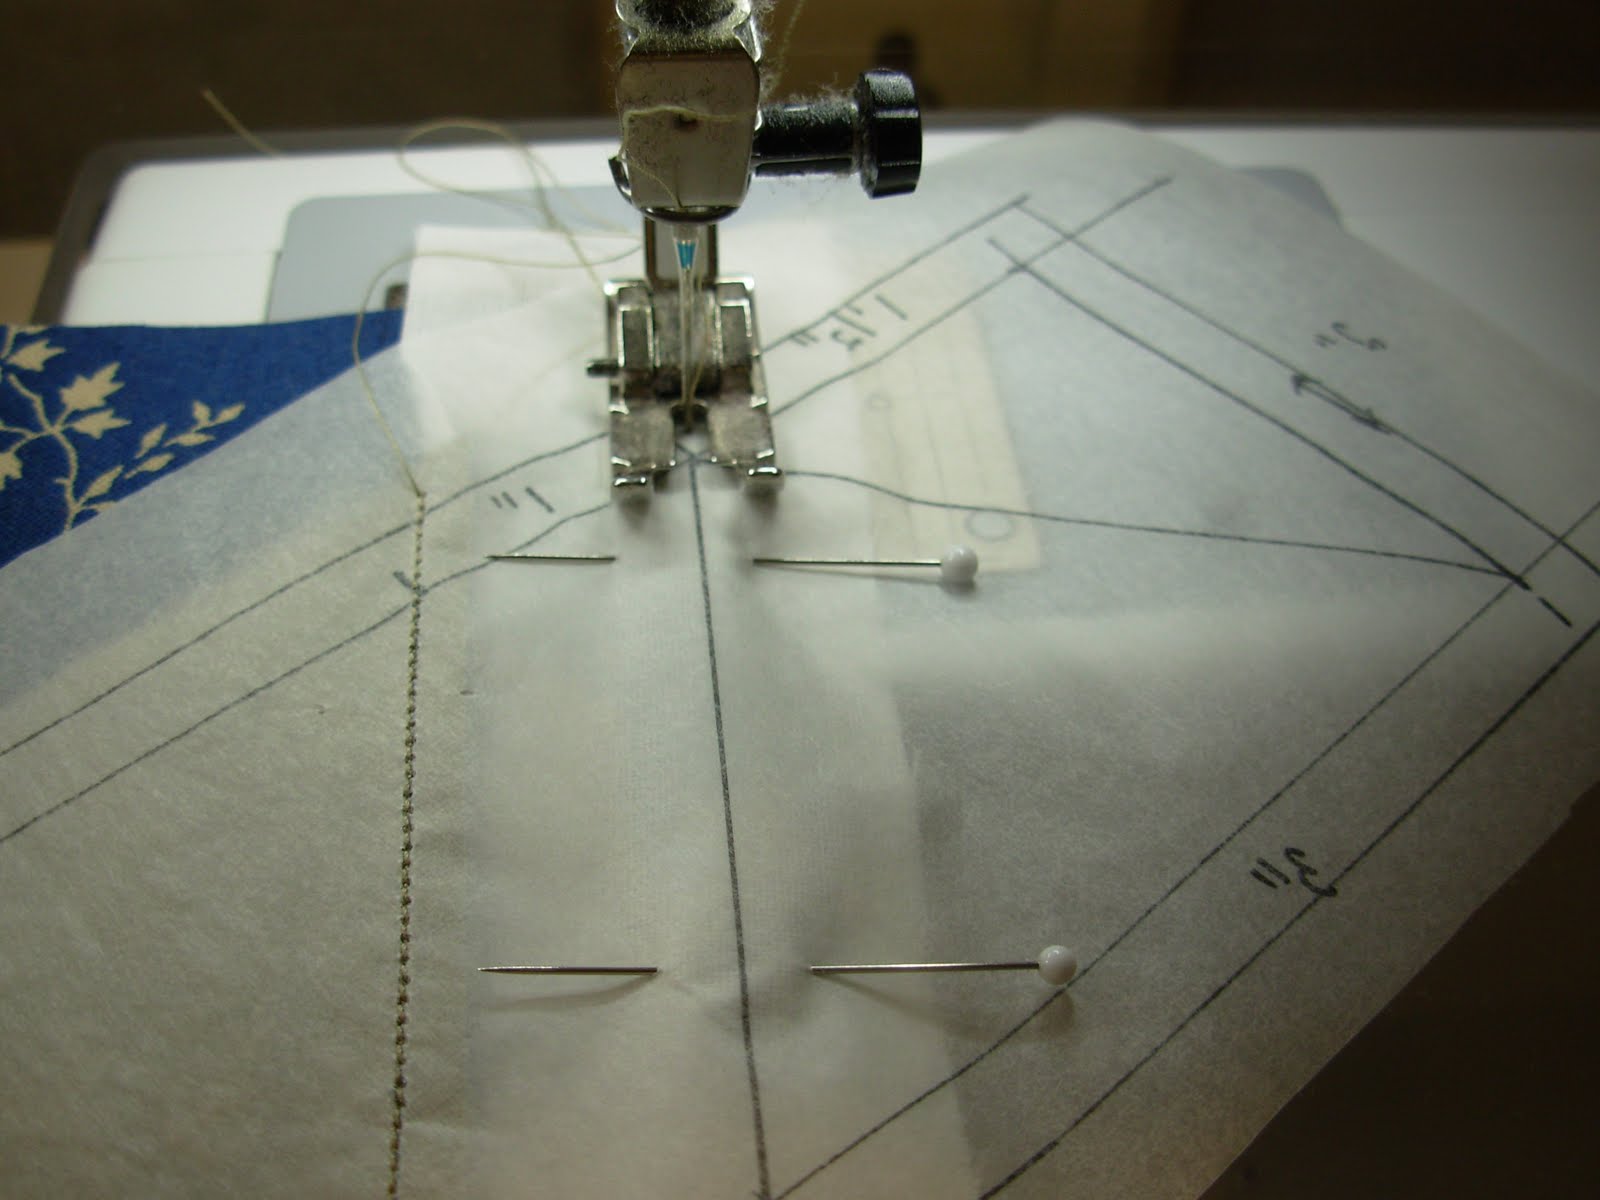
With paper right side up, cover piece 4 (I should have labeled these- piece 4 is the big section of roof) with a piece of your 3" blue strip (cut it making sure it extends at least 1/4" all around). Place a piece of the 2 1/2" white strip on the blue strip so it will cover piece 5. Since section B is asymmetrical it is important that the fabric is right side up on the marked side of the paper.


 Turn over and pin-

 Stitch-

I like using my "add an eight" ruler to trim the seam allowances.


 Press without steam-

Right side of the roof complete. Now start on the other side using the 1 1/2" white strip-


For the triangle use the 3" blue strip. Make sure you have it placed so it will cover the whole triangle when flipped over.


For the last piece (which is actually piece 1 in the diagram) use the 2 1/2" strip-


This is what it looks like after all the pieces are sewn and pressed-

The other side-

Trim all the way around being sure to keep your 1/4" seam allowance-


This is what I do to make sure seams match up where they need to. Measure 1/4" between piece 2 and 3.

I would do the same between pieces 8 and 9, but since I have the paper I can use the 1/4" line.

Keep that pin going straight through both sections and pin on either side. Remove the pin in the middle. Pin the rest of the seam, doing the same where seams need to intersect just right. Stitch.

I pressed the seams toward section B to minimize any blue shadowing through the white.

Not too bad-

  
Remove the paper-

Finished block-

To the one person who made it this far! Hi, Mom! LOL. Please let me know if you have any questions. I didn't show every single step, though it may seem like it. I'm sure there are plenty of videos on Youtube showing you how to paper piece. I always do a quick review in Carol Doak's book and think about what I'm doing before I stitch. Because of the small stitch length you want to avoid having to rip out.

I'm not exactly sure where I'm going with these blocks. Can't believe I've started another quilt! I will probably keep it relatively small - maybe 20 blocks and with 3" white sashing all around.

Wednesday, January 18, 2012

Monday, January 16, 2012

Pink Lemonade


My top is finished! I saw Lori’s post after watching Downton Abbey last night and just had to go down to the sewing room and finish it. It looks a bit warped in the photo, but is actually pretty straight. I haven’t decided if I want to hand or machine quilt it.

Along with Pink, I’ve been working on my Lone Star – three diamond borders finished – one more to go and then I need to figure out what to do for the corners. I have templates to make 6” Lemoyne stars but the borders will finish at 6 ¾” wide. I guess I could add strips of background fabric to make it fit or draft a slightly bigger star. I think I will have just enough of the background fabric so I need to plan carefully.

I’m making additional pinwheels for the Stars and Stepping Stones in leader/ender fashion.


I had some oral surgery last Wednesday, a dental implant, so I wasn’t feeling up to sitting at the sewing machine for a couple of days. Instead, I did some hand quilting on Lori’s QAL from last year. I have just a little more to go. I hope to finish it in time to enter in the QU quilt show.  I’m also entering Concord, Cranston and PeterPan and the Lone Star if I can get it done by the end of February.

Looking forward to more of the same stitching this coming week. I also plan to do some cleaning out around the house. I set out 3 big bags full of stuff for a local charity last week, filled another bag since, set aside some things for a consignment shop and moved some things into my daughters bedroom. If her life goes as planned she won’t be in it for over a year so I decided to use it as storage for a while. I freed up some space in my sewing room – a good thing as long as I don’t fill it up with something else!


I've been meaning to share this with you - a tray my husband made back in the 90's when he was into woodworking. Didn't he do a wonderful job? It's on a chest in our family room.

Happy Stitching!

Saturday, January 7, 2012

Little Blocks


Here are my Pink Lemonade blocks for Lori’s quiltalong. I had fun selecting the fabrics from my stash. I’m happy with what I found.

I’m listening to John Adams by David McCullough on CD while I sew. Because I’m using an old boom box, I have to listen to a whole CD before taking a break – I can pause it, but I’m not sure I can turn the thing off and be at the same place when I turn it on again. I could test it, but won’t.  ; c ) I’m getting more done in one sitting than I used to. It’s a long book - 26 CDs. I read it many years ago and loved it and now my book club is reading it. I knew I wouldn’t sit down to read it again (too much happening in the sewing room). This is the first time I’ve listened to a book while sewing and I don’t think it will be the last.


These are my 9-patches for the block exchange I’m organizing. I must be about as good giving directions, as I am following them – not so well. I received a lot of questions about my instructions and at the meeting last week we discovered that one woman had made all her 132 blocks exactly the same. We have 22 participants and we are making 6 sets of 22 blocks in order to get enough for a lap quilt of 132 different 9-patches. The blocks will finish at 3”. She had already put so much work into it so we told her we would use what she had. She had pinned and chain pieced them at the meeting and when she got home she asked her mother to pull out the pins and snip the threads. When she came home from work she found the blocks totally taken apart and she now had a bunch of 1 ½” squares. Her mother misunderstood and ripped out the seams! OMG! She said she had to excuse herself from the room. I think I would have done the same to cry and then to laugh at the absurdity of it. She emailed me and said those blocks just were not meant to be. She has since started over! I feel so bad for her and hope in the end she is happy with all the 9-patches she receives. Our exchange is later this month and we may do it again in February. Some of us want a bigger quilt.

It really is time for me to get back to my lone star. I’m really pushing myself with this project. I’m not crazy about the fabrics anymore, but I found in the past that I learned from projects like this. Because I don’t absolutely love it I’m willing to take more chances and sometimes loving it in the end because of those chances.